

Материал из ЭнциклопАтис
| Ryzom | Gameplay | Roleplay | кодекс | Сообщество | Forge | Небольшой глоссарий |
Справочный текст ( Сохраненный текст, используется как ссылка ) :
Примечания : (Zorroargh, 2022-05-04)
| Прежде всего | Бороться | Мэги | Pемесленничество | Бурение |
Общий обзор
Reference text ( Maintained text, used as reference ) :
Notes: (Craftjenn, 2024-10-12)
In Ryzom, harvesting or foraging is how homins extract raw materials from the ground. It's the Atys equivalent of what in other MMOs is often designated 'mining', 'farming', 'gathering', 'scavenging', and so on. But harvesting in Ryzom is very different from the simple "find source and click on it" that it is in most other games. As with crafting, harvesting is a fascinatingly complex system with many little quirks and oddities.
This means for many new players harvesting entails a steep learning curve. If you're a new player trying to start with harvesting, it is recommended you start by doing the tutorial missions from Miles Dodoine on Silan, using this guide to those missions if you get stuck. Those mission provide an excellent hands-on crash course regarding the basics of harvesting. And once you've got the hang of that, the rest is just experience and experimenting.
For extra reference, this harvesting guide below from Pegasus Foundation might be helpful. It's somewhat inbetween a starter guide to harvesting and an advanced guide to all aspects of harvesting. It doesn't include all quirks of harvesting, but it has most. Again, it is not recommended you start learning harvesting by reading this entire guide first, it's recommended you start by just picking up the tutorial missions, using this guide as an extra aid.


Some of the more exotic sources you might end up harvesting.
Intro
So you want to start digging and playing in the dirt, or the sand, as the case may be.
First off, a warning: harvesting is one of the few skills in Ryzom where you can go wrong and actually NOT be able to level anymore (at any reasonable speed). This can happen if you spend all your skill points without upgrading the quality stanza when that upgrade is available. Below we will expand on this point.
To start harvesting, you need a tool: a pick. If you do not have one, you can purchase one at the Tool Merchant in any town. Those who are starting on Silan will have a q1 pick in their inventory by default, along with an action for q10 harmful extraction on the action bar.
Harvestable materials are visible in-game as green blobs on the ground, and they are informally called nodes and/or sources. Such nodes may be spawned by the server in a number of preset places, or they may be deliberately searched for with a prospecting action, by a player — this is the way most players end up interacting with them.
The appearing of a node is informally called "popping". Once prospected/spawned, a node will not stay infinitely available; after a time, they will de-pop/fade out.
A beginner harvester with no prospecting actions can still use the sources that pop outside the Ranger Camp's fence, or near any capital city's main gate / stables. Those are labelled with "Raw Material Source". Target one of them and then double click on your Extraction action. This will begin the harvest/extraction process.
Another thing to remember: Only Harvest in Light Armor or Naked. Medium and heavy armors carry malus, which has a number of side-effects: it will degrade the final quality of the material, use a lot more of your focus, and make the source more unstable. Even the Ranger armor that you are awarded on Ruins of Silan is not meant for digging, since it is a set of medium armor. So if you do not have light armor, strip down to dig.
Focus Use
Harvesting costs focus, just like fighting costs stamina and/or hitpoints. The cost unit is one swing of the pick for extraction.
There is a notable difference in the mechanics of focus, based on whether the node you are harvesting was player-prospected, or auto-popped. Harvesting auto-popped nodes (e.g. like the ones available near a city's gates) means you do not get back any of the focus you spent during the action.
However, harvesting your own node (or someone else's!) DOES return the spent focus at the end of the action, allowing you to continue harvesting another node with no delay. At higher levels, a player may even prospect and pop several nodes at once, spending some focus for that action, but then harvesting several of them continuously. (As a side-note, prospecting your own nodes also yields more xp!)
If you like, you can also create a self heal focus that just barely covers the amount of focus used for your prospection. For many, many levels this will be your lowest, a 100pt self heal focus. The timer on the 100pt self heal focus is low enough that every couple of harvests, it will come back. Again, just another trick to help you stay harvesting and sitting around waiting to regen.
Extraction
When you begin extracting from a source, three things happen:
- a message will appear in your System Info panel, with the "Optimal Quality" of the source and the source mode
- an information screen appears near the node, with details about it (see picture below)
- a "Forage Progress" window appears, showing the amount and quality of materials you gathered so far. Here you can click "Take All" at the end.
A note on quality
Harvesting actions do not immediately jump to the quality set in the stanza. The quality of the materials, shown in the " Forage Progress" window, steadily "climbs" through intermediate quality levels. For example, someone digging q200 materials will see the window show a progress through q48, q88, q120, q148, q169, q188, taking a total of 7 swings of the pick before the materials are of q200.
If the harvesting action is catastrophically interrupted before the target quality is reached, the materials will remain at the last reached quality — for example, if the player is killed by a mob, by another player, or even by self-inflicted damage like poisonous gas.
Sys Info explanation
The optimal quality available is the maximum quality you can harvest from that source. This number is usually equal to a region's highest mob levels, but there are exceptions (such as Silan, or the Kitin Lair). As an example: Majestic Garden is a q50 area, and you can harvest up to q50 mats there. Grove of Confusion is a q250 area, so you can harvest up to q250 mats there. You are also bounded by the level of your own actions; for example, a harvester with a stanza for Extraction 100 will only pull q100 materials, even in a higher level region. (and conversely, using Extraction 100 in Silan will only yield up to q45 materials)
The source mode, a number between 0 and 5, tells you what kind of stability the source will have. Will there be risk of premature failure? Will there be risk of blowing up and/or exploding? For the most part, it will not matter a whole lot, since the player cannot influence this mode; but it can help you prepare or switch actions accordingly. Note that this mode changes once during the action, when you reach the maximum quality of the node.
Information screen
When you target (click on) a source, you will see this information screen. (See Image on the right)

From top to bottom, these are: (More detailed info to follow)
White: Time remaining
Blue: Source Content (amount of materials)
Red: Source Health (the heart)
Yellow: Source Stability (Explosion Risk)
Orange: Kami Tolerance
All of these will decrease as you harvest the spot. If any one of these bars completely disappears, you are done harvesting from that spot.
Source Modes
The status of the sources is displayed in the sys-info channel. It changes when the maximum level of the source is reached during mining. To stay informed at any time, you should detach this channel from the chat window by right click on it's title and place it in reach of your eyes ...
- Mode / Status 0: Highly resistant source. Towards the end it becomes more and more unstable and dangerous. The life of the source first diminishes slightly, but the stability decreases rapidly until a violent explosion or sudden emission of a gas cloud.
- Mode / Status 1: Very resistant source with relatively good stability and very little damage. The ideal mode, the favorite of most harvesters: A mistake won't be so dramatic: You only lose some life and experience. However, beware of abrupt changes from mode 1 to 0: High risk of immediate explosion, which may be fatal. A little care by stabilizing the source will be enough.
- Mode / Status 2: Volatile source, very stable ground, large occurrences, very high stability, high damage. A little attention around life will be enough to get yourself to safety. This type of source explodes extremely rarely, but when it does, the damage is high, and a poisonous gas cloud is left behind.
- Mode / Status 3: Unstable and unsustainable source, low damage. An unpopular mode because it requires a lot of care in stability and life. However, one mistake almost never costs the life of the careless harvester: Only a little explosion followed by a poisonous cloud with low damage.
- Mode / Status 4: Stable, relatively long-lasting source. That is the opposite of mode 1: A little attention around the life of the source will be enough to be safe. You won't? Then beware of serious damage! Any however possible explosion and / or gas cloud may cost your life!
- Mode / Status 5: unstable and not very long-lived source, high damage. The worst status for harvesting. it is the "nasty form" of status 3: mistakes are less forgivable, since both the explosion damage and the gas cloud damage are higher.
- Other Modes: Stable Springs. During the first harvesting stages, the sources show higher modes (11, 12, a.s.o.). Don't worry. At this level you just have to dig. Unfortunately, these modes disappear around stage 10...
Further Explanation:
Time Remaining:
Very simple: When this timer runs out, the harvest action is finished regardless of how many materials you managed to pull.
This timer is short when you begin, but may be extended with the "Source Time +" stanza, added to the prospection action. Note that the "Multiple Spot +" stanza does NOT influence the timer of a node that is currently harvested, but it does help the nodes stay popped for longer, before they fade out of existence.
Another way to increase the amount of time for all nodes that you prospect is to do a certain rite in the Tryker lands.
Source Content:
Source content is how many materials are available in that node.
The actual value often has a fractional part, which is then rounded up for display. For example, even though the displayed value is 12 for a node, you will only be able to harvest 11 materials from it, due to its actual contents being 11.7 or other such partial values.
This value is particularly relevant for players that provide careplanning for their nodes. It may make no sense to keep restoring the Source Health, if you already extracted the entirety of the Source Contents.
Source Health:
This is the life or heart of the source. As you harvest, this bar will decrease.
The rate of decrease will depend on the source mode and your extraction stanzas. Some source modes are simply more prone to a more premature ending of the node's health. Gentle stanzas will make the decrease pace slower and steadier, whereas Harmful ones will make the pace faster and more unpredictable. You can increase this bar (heal the source) by using Resource Preservation. This is one of the careplanning stanzas available.
When this bar goes out, the source will be prematurely destroyed regardless of any remaining time, and the materials may be collected. Informally, players call it "killing the node", when the bar is allowed or even encouraged to do so.
Some players claim that repeatedly killing one's nodes will affect the entire small area around the player, resulting in a lower average amount of materials in any nodes prospected (for a short while).
Explosion Risk:
This bar tells you how stable the source is. Again, this will decrease as you extract from the source. The rate of decrease will also depend upon the source mode and your extraction stanzas (gentle vs harmful). If this bar runs out, there are two main possibilities: an explosion or a toxic gas cloud.
Explosions do a single instance of damage in an area, ranging from 50hp to over 2000hp. The damage and area increase based on your level (the higher the worse) and the grade of the materials you are harvesting (from basic to supreme). A master harvester causing an explosion in the Prime Roots while digging supreme grade materials may instantly kill themselves and a few nearby players.
Gas clouds do DPS (damage per second), also in an area effect. Both the potency and the AoE are based on the same factors as above, level and material grade. The player(s) can step out of the cloud to avoid further damage, but in that case they must wait for the timer of the active node to run out. Potent gas clouds can do multiples hundreds of hp damage, effectively killing everyone nearby in a matter of seconds.
You can avoid explosions and gas clouds by using the careplanning action Ground Stability. Note: if not careplanned, this bar may run out several times per node, not just only once. You may gas yourself, then make it explode, and if you are really unlucky, gas yourself again.
Kami Tolerance:
Kami Tolerance stems from the lore, specifically the point that the Kami protect against over-exploitation of the planet's resources. Therefore, should an area be over-drilled, the Kamis will step in.
KT is not really effected by one single person; it takes multiple people to noticeably make it go down, over a pretty long period. Usually the common q250 digging spots above ground are the most affected, where 4+ people are digging constantly. It is also zoned, meaning one 'area' in that region may be close to 0 but another area could be full.
When KT gets very close to 0, you will get a message in the sys window saying something like "You have stolen from the land, the Kami will punish you". You still have a little time if you're digging alone, but not long... maybe 2 minutes before a lightning bolt of 6k damage pounds you into the ground. Sadly, from the player's viewpoint, this is not visible. Once striking the players, the KT is not immediately restored to full.
Extraction Stanzas:
Once you start getting upgrades to your extraction process,you'll want to start tweaking your harvesting to best suit your needs. There are three essential stanzas for extraction and a couple of extras. You will also have to decide between Harmful and Gentle for each of these. Definitions of these will follow.
Harmful vs Gentle:
Harmful stanzas cost less focus than Gentle ones, but are more harmful to the spot. This means that the Explosion Risk and Health bars of your source will fall much more rapidly. There is no "one size fits all" recommendation here, because it depends on individual factors such as playing style, attention level and so on.
Rate:
Rate is how much you can pull with each swing of the pick. It is likely a good idea to keep this as high as possible.
Speed:
Speed defines how fast you swing the pick. Higher speed means less time per extraction action. This is the one that can cause you to run out of focus very quickly at medium levels. This is why it is recommended that if you have to choose between rate and speed, keep rate higher.
Quality of Mat (the q number):
This is the maximum quality of the materials. When you unlock the next higher quality, you get an action to dig 10 levels above your current — e.g. if you just reached level 60, you may buy Gentle Extraction for Quality 70. (more details in a note below)
It is paramount to always keep some skill points to buy the latest upgrade here. If you fail to upgrade, your xp gain falls sharply. Consider: a harvester that keeps digging with a q70 stanza, despite having level 80, will earn a lot less experience. With too few xp points coming in, you now can't afford to buy the stanzas you need. It takes forever to dig yourself out of the problem you've created.
Terrain Specialization:
This is just what it says it is. This means you are taking extra care because you know this terrain. The terrain specialization will help stabilize your source. You will be able to get more mats and not have to care quite as much. It is not a cure all. The differences are not huge, but they are there. This stanza is considered an essential for all parts of harvesting. There is a terrain specialization for each land: Forest, Lake, Desert, Jungle, and Prime Root. So make sure you are using the correct one. The Prime Root terrain specialization is not available to you until you reach level 150 in one of the other lands.
Material Specialization:
Like terrain specialization, but in this case you are taking extra care because you know this material. The effects are very similar, but somewhat smaller than those of terrain specialization. This stanza is often skipped because you need to change it every time you dig a different material. There is a material specialization for all 10 types of craftable materials, plus several more for the mission materials; it is probably a good idea to prioritize other much more important stanzas, before buying the full set of mat specs.
Note: Player observations show that having a material specialization in your action makes the quality "climb" faster. That is, it takes far fewer swings of the pick before you are harvesting the highest possible quality materials. This may be especially relevant in dangerous areas, if you wish to spend as little time as possible on each node, ready to run at a moment's notice.
Update and Missions mats
In 2020, have been added:
- specialization for prospecting mission materials.
- For drillers who are at the maximum level in the 5 regions: Atys prospecting and extraction (big space saver on the hand bars).
Prospecting and extracting mission materials (here at the modification of a stanza) images (for now in French)
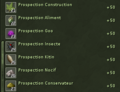
Prospecting: choose the class to look for for missions

then more finely (here under menu of Goo)
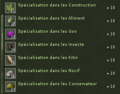
Specialty for extracting


See https://ballisticmystix.net/?p=resources;mission
XP (experience)
What determines XP and why does it change sometimes? How do you maximize your harvesting XP? The long and scientific answer is outlined in the game forum.
The simple version is this (from most important to less important):
Q of mat (the q #) --> Higher Quality (Better) Mats --> Number of Mats
Q of the Mat
The first and foremost important thing for XP in harvesting is the quality of your mat. By this I mean, the quality number, as in q10, q140, etc. Keep this as high as possible at all times. As soon as you are able to train and get a higher q, do it. You will be able to obtain the Harmful Extraction upgrades at 15 levels below the quality number. So you can get Harmful Extraction q50 at level 35. You can obtain the Gentle Extraction upgrades at 10 levels below the quality number, i.e. Gentle Extraction q50 at level 40. The general rule, though, is: Only harvest at 10 levels above your current level. Trying to harvest at anything higher will result in degrades, less xp, a messy looking bag and lots of frustration. So even though you can get Harmful Extraction 50 at lvl 35, you still only want to harvest q40 mats until you reach level 40 and then switch to q50.
Higher Grade Mats
The second most important is getting Higher Grade mats. The order of these is:
Basic --> Fine --> Choice --> Excellent --> Supreme and:
Average --> Prime --> Select--> Superb--> Magnificent for mission materials
You will see your rate of xp go up as you start harvesting better mats.
Most of us have noticed that Choice seems to be just as common as Basic or Fine mats, so you might as well focus on harvesting Choice mats as soon as you can get them. The exception to this is when you are digging in a different land and you cannot use the mats from that land to craft with. Remember that for crafting, if you want to use Choice or above to craft an item with, the mats must match the item in regards to what land they are from. Example: You are a Tryker and you have been focusing on your Lake Foraging. On top of this, you craft only Lake items (because that is what you started with), so you have to have Lake Choice mats if you want to use Choice to craft with. You want to start foraging in other regions for more skill points. So you come over to the Forest (Matis area) to gain some XP. You will most likely want to harvest Basic or Fine here so that you can actually use the mats to level your crafting. If you plan on just selling the items, then Choice will work. Prime Root mats are the exception, as PR mats of any quality can be used to craft any race's items.
Amount of Mats
Next on the important list is the number of mats that you are able to pull from the source. You will start out only being able to obtain 1 item from each source, but have no fear; this will go up as your levels go up.
Careplanning
In regards to XP, you need to remember that if the heart runs out or if the explosion risk bars runs out, you will lose xp for that extraction. This can actually cause you to lose around 100- 200 points per pull. (Those careplans really do pay for themselves.) For more advanced harvesting (when you're pulling from multiple sources), sometimes it will pay off to let the heart run out shortly before the time does, so that you can get to the next source before it disappears. This can increase your XP per min. But this is for expert foragers to try out themselves.
Other Harvesting XP
Lastly, remember that you will also get xp for prospecting your own sources, instead of using the ones that pop around town. Plus you get xp for careplanning for someone you are teamed with. XP is determined by the highest level person. You will also get xp when someone harvests a spot that you have prospected. Once again, this is dependent on the level of the person who extracts from it.
Prospection
Now that you've gotten a few levels from digging around town, you'll want to start prospecting your own sources. Prospecting for your own sources is an essential skill for your overall harvesting experience and capability. In fact, you will not be able to get over q50 mats without it.
To start prospecting (or finding) your own sources, you will need to purchase the Basic Prospection stanza from your local Harvest Trainer. You can train this skill as soon as you have enough points.
When you first learn this skill, you have the ability to prospect or find Basic materials that are directly in front of you. You almost have to be standing on top of the source to be able to find it. The good news is that many upgrades come quickly.
To use your Basic Prospecting skill, just stand in the place that you think there might be a source and click the skill. Your character will go thru the motions and then you will either find a source popped up on the ground or you will get a message as to why not in your system info screen. Your sys info screen will also tell you how many sources you have found, if you find them.
Once you start leveling, you'll want to increase your prospection ability as soon as possible, while keeping your extraction plans where they need to be in order to maximize your xp. Here are the explanations of the prospecting stanzas that you can incorporate into your prospecting action and their importance.
Range:
Range is how far out you can find a source. You start off only being able to find what is directly under you, so upgrading this is essential at first. Though, the higher level range stanzas will only be important when you are searching for something. Most of the high level harvesters still only use Range 2 for most of their digging.
Angle:
Angle determines how far around your body that you can locate a source. If you have 90 degree angle on your prospection, you will be able to find a source that is within a 90 degree angle whose point is at your body. Basically spread your arms so that they are 90 degrees apart and that is the area where you can find a source. This goes up to 360 degrees at level 250. It is recommended that you keep this as high as possible. Also, angle is normally recommended before range.
Better Quality Mats:
This is the ability to find mats that are of better quality. You start off with only Basic. Very quickly you can increase this to Fine, Choice, etc. These stanzas will come in two types. First is the "Find Up To" and second is the "Find Only". This means you can look for "Up to Choice" sources or you can look for "Choice Only" sources. In the beginning you will most likely use the "Find Up To" versions, as you just need to get a feel for where things are, etc. Not too long into your harvesting career, though, you will most likely switch to a "Find Only" stanza, because you will know where your sources are and what you want. This is especially important since Choice gives more xp than Fine or Basic and Choice really is just as common as the Fine and Basic. You will always want this in some fashion in your action.
Terrain Specialization:
This is the same as for the extraction terrain specialization. This gives more time for your source, keeps it healthier and is a must for whichever land you are trying to forage in.
Multiple Spots:
This is the most misunderstood stanza for prospection. Many do not learn this because they feel that they do not have enough time for one, why would they want to pop more! It is actually just the opposite. Finding multiple spots has several uses. First, it allows you to see what all is around you. A lot of times there are multiple types of mats in one area. Secondly, it gives you more sources to harvest. The most important, though, is that using this stanza in your prospection actually increases the amount of time your sources will stay available. The general rule of thumb is that you will be able to get around half of the sources that you prospect for. So if you prospect for 2, you'll be able to get 1 of them. When you prospect for 4, you'll be able to get 2 of them. At 6, it starts changing a little, but we'll cover that in a more advanced section. This stanza is rated as very important to your action.
Knowledge:
Prospection with Knowledge is an awesome tool, but not essential at first. This stanza allows you to know what is in the source. When you first start prospecting, you will only see that it is a Raw Material Source. With Knowledge, you will know what type of mat it is. At Knowledge 1, it tells you the general type, such as bark, fiber, etc. At Knowledge 2, it tells you the specific type, such as Shu Fiber or Beckers Bark. It eventually goes up to tell you exactly what it is with details, such as Choice Prime Root Shu Fiber. This stanza, though, will cost a lot of focus in your action, so use it wisely. Know when you don't care what you're digging, and when you need something specific. Also, once you know your locations for particular mats, it becomes less important, but if you are searching for something specific, this is essential.
Accelerated Prospection:
This is probably the least needed of all of the prospection stanzas, but it sure is handy. This does exactly what it says; it decreases the amount of time it takes to prospect. Be careful as this can use a lot of focus as well.
Extraction Time Bonus:
The stanza adds time to the amount of time you have to extract from a source. This is very important at first because it can mean the difference between 1 mat and 2. Up to around level 100, you will want to keep this maxed. After level 100, you will want to play with this to get the most xp for your min, so ask around for suggestions. (At level 150, I am using only Time 3, yet I could use Time 5. This allows me to get 3 sources from one prospection and more xp per min.)
Material Specialization:
This allows you to look specifically for one particular item. It can be a general type of mat, such as bark, shell, etc or can be specific such as Mitexi Bark or Big Shell. This is a nice feature once you are at higher levels, but can use a lot of focus at lower levels. Also, at the lower levels, the sources are not very mixed in. For the most part, the different types of mats are separated out enough that if you know where the mat is, you should be able to pop just that. At higher level areas, this changes. You will find things grouped together in such a manner, where this is almost essential if you are looking for something specific.
Careplans
Careplans help you heal the source while you are extracting from it. A careplan is done in the middle of extracting. Basically as your bars start to decrease, you will click your careplan button to heal it. (Somewhere around half way down.) When it has gone up enough for your needs, you will then click back to your extraction action. There are three types of careplans. You will want to keep Resource Preservation and Ground Stability maxed out for when you are soloing. You can combine these careplans into one Care Action. You can also add Terrain Specialization to your care actions. If you are solo harvesting, you'll want to have separate actions for each of these with the corresponding terrain specialization and one that has both in it with terrain specialization. If you are careplanning for someone else, ask them which level is best and use a combined one at the level they recommend.
Resource Preservation:
This type heals the Heart of your source as you extract from it.
Ground Stability:
This type heals the Explosion Risk bar of your source.
Reduce Explosion:
This is almost, due to the needed timing of using it, impossible to use. After speaking to a GM about it and asking what I was doing wrong on it, he said it has to be used at an exact time before it might explode. Read as: Don't waste your points on it right now.
Deposit Tracking
As was explained to me by a guide, this will only get you in the general area, within about 20-30 meters. You will need the Deposit Tracking Stanza and a Material Specialization (the mat you are looking for). Put together your stanza for what you are looking for, click and follow instructions on the bottom of your screen.
Three problems with this are
1) The fact that when looking for higher grade, weather restricted mats, it won't tell you if any is left or not, just if it would be up or not. 2) Still seems a little buggy in some areas, because it will show that you are standing on it, but nothing is there. 3) If you get in the area, you still have to find it.
Notes
Just a few other notes regarding foraging: Sources do not move. There are big fields of them and sometimes you will pop a spot that looks like it is somewhere else, when it reality it is the same field just a few meters away.
Sources can be season and weather dependent. Though, this is normally only true with the excellent and supreme spots and spots in the Prime Roots.
On a final note, it's normally recommended that around every 20 or so levels, you play around with your stanzas to see what is going to work best. If you have questions, by all means ask in region or universe chat. Ryzom has the best community out there and the people are willing to help.
Other links
See too, on this wiki :
- Silan Guide/Harvest objectives and tips on Silan's mission.
- Some occupations concerns forage.
- User_Manual#Forage_Window, User_Manual#Foraging, and, two macros User_Manual#Extract
- about seasons (when dig what) https://sites.google.com/site/ryzommaps/seasonalinfo
And on the German and French wiki
Source
- This entire guide had been copied from: Pegasus Foundation ... with the following relevant modifications / additions:
- Added the section Source Modes based on the German and French wiki paragraphs, which explain the possible modes (0, 1, ...5) [Aug, 8th 2023]
A Word of Warning about PvP
Digging in PvP zones leaves the player open to being attacked. If you do not wish to be attacked, do not dig in PvP zones. These include;
- Lands of Umbra
- Nexus
- Outposts at war:
- also, 200m around an Outpost which has been declared as a battle zone, even if the battle has not yet started. There is a warning as you approach.
Spoilers
See Harvesting/Spoilers (maps showing spots: on Nexus and Grove of Confusion).
Ryzom - Ризом: Лор • Игра OOC
Атис: Мир Атиса • Флора • Фауна
Нации: Файросы • Матисы • Трайкеры • Зораи
Фракции: Ками • Караван • Мародеры • Рейнджеры • Тритонисты
Энциклопедия: Хроники Атиса • Великая Библиотека • Мистерии OOC
Данные
Чаты (окна разговоров) Ryzom предоставляют большие возможности. Еще нужно знать их...
Пояснения на этой странице касаются чата IG (в игре). Мы также можем использовать браузер и иметь доступ к чату без входа в игру через чат. Очень полезно обмениваться ссылками в интернете (копировать / вставлять их проще), а также в случае технических проблем или проблем с оформлением / обновлением (войти в систему с именем пользователя и паролем игры)...
Задачи
Архивы/категории
Примечания
Web-Apps sind kleine Apps, die von Spielern entwickelt wurden, sie synchronisieren sich in regelmäßigen Abständen mit dem Server (und manchmal mit anderen Servern), oft gibt es eine Verzögerung von 10 bis 20 Minuten. Einige Apps haben nicht ganz die gleichen Spiel- und Out-of-Game-Funktionen (mit Browser) - bitte überprüfen Sie auch die Konfiguration des verwendeten API-Schlüssels (es ist praktisch, einen Schlüssel pro App zu erstellen).
Sie können entweder im Spiel oder über einen Browser auf die Apps zugreifen (melden Sie sich mit Ihrem persönlichen Namen und Passwort an).

